OpenOffice Database
The following files will be required for the query exercise. Be sure to resave the files as instructed in the text.
| ch05_mid1_music.ods | ch05_case_baseball.ods |
The OpenOffice database program could use any of several file types to generate a Base system. These file types include Microsoft Office files, address books, and miscellaneous other spreadsheets.
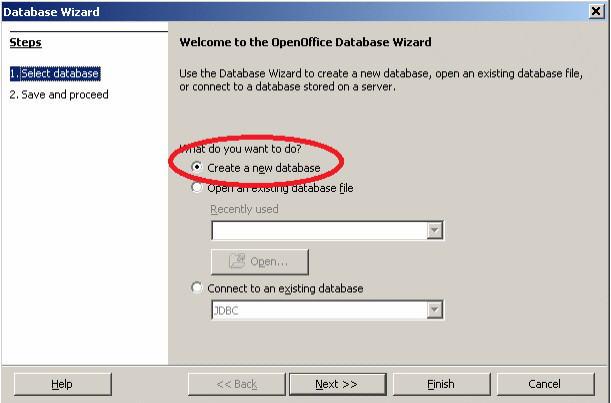
From the OpenOffice menu click on Database. The following screen should appear.
There are 3 options presented - "Create a new database", "Open an existing database", "Connect to an existing database".
Create a new database - allows the user to create a new database file from within the OpenOffice program (Default).
Open an existing database file - allows the user to access an existing file. The option assumes that a compatible file is accessable.
Connect to an existing database - allows the user to access many types of data files including files created by other databases, spreadsheets, and PIMs. From this option the type of file to be accessed will have to be selected.
In this exercise a new database will be created. The default option will be used. Click on "Next".
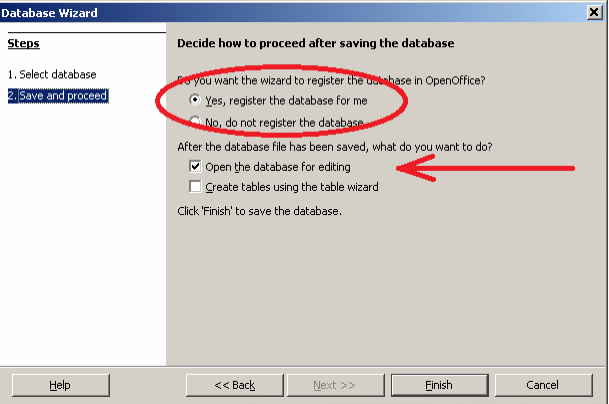
The screen above asks two questions -
The first is to register or NOT to register the file being created. By registering the file other OpenOffice applications can access (share) the file. Unless there is an over-riding need not to, file registration is the preferred option. The second question asks if the database file is to be edited and if the structure for a new database table is to be created. (a check means "YES"). Make sure there is a check in both boxes and click on "Finish".
At this point the project needs a name and a location that is to receive the file (the folder). Name the project "Employee Records". Leave the type as "ODF Database". Identify a location (folder) where the project can be found easily. Then click on "Save".

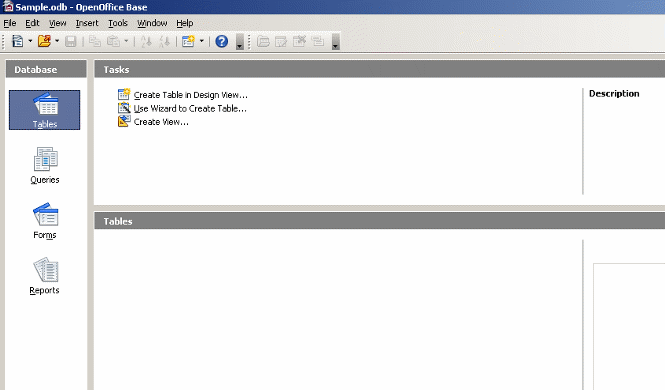
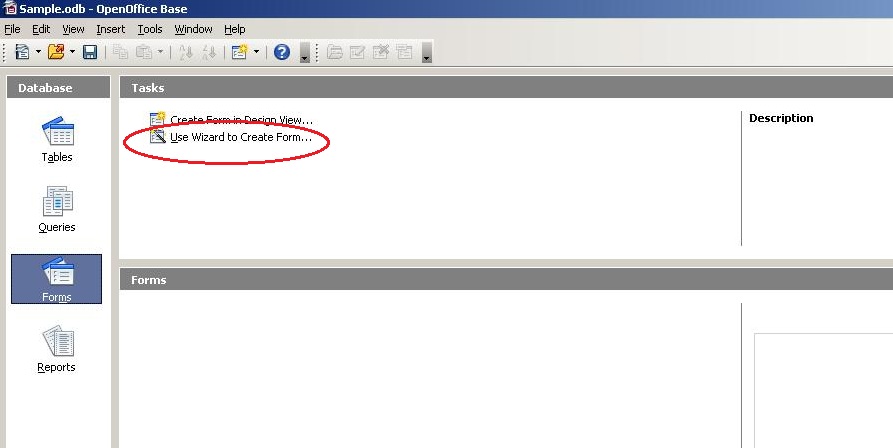
Now you need to determine how you are going to build the data base. The data table is the heart of the data base. Creating it will be the first step. In this tutorial we will be using the development Wizard so select "Use Wizard to Create Table..." option (refer to the following graphic).
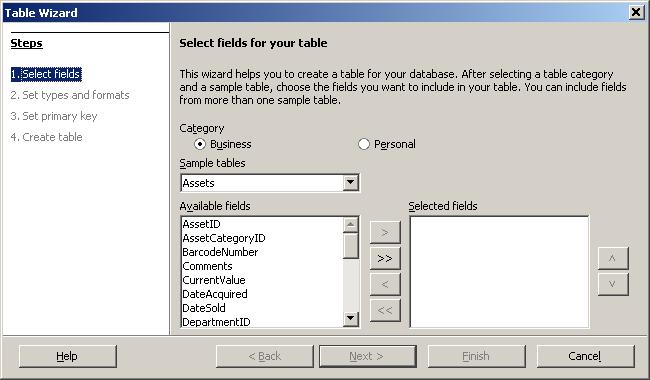
In the next dialog box, the wizard is asking for the type of table or record that is being created. This is because it can help with the type of data that might be needed. Notice that one of two options can be selected, "Business" or "Personal". Select "Business". Under the "Sample tables" find and select "Employees"
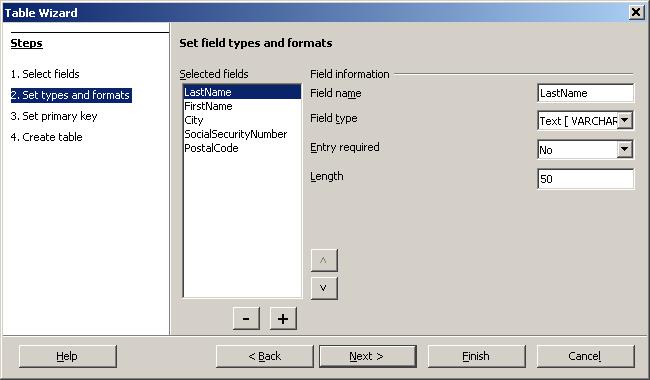
Under "Available fields" notice that there a number of possibilities. The options are listed alphabetically. Find "LastName" and single click on it. You will see the ">" and the ">>" buttons become available.
> - means this field will be selected
>> - means all fields will be selected
Click on the ">" button. The LastName field is moved to the selected area.
Find the "FirstName" field and double click on it. This selects a field also. Now select the following fields "City", "SocialSecurityNumber, and PostalCode. If a mistake is made, it can be corrected by "Un-selecting" it. Under "Selected fields" double click on "SocialSecurityNumber". Click on "Next".
Contnue to select the requested fields. Once you have finished with the selection, click on <Finish > .
With the fields selected.

The next screen allows you to review and edit the properties of each of the fields. Click the "Down" button by the "Selected fields" box. The properties of the various fields could be changed but at this point the default values will be used. Click on "Next".
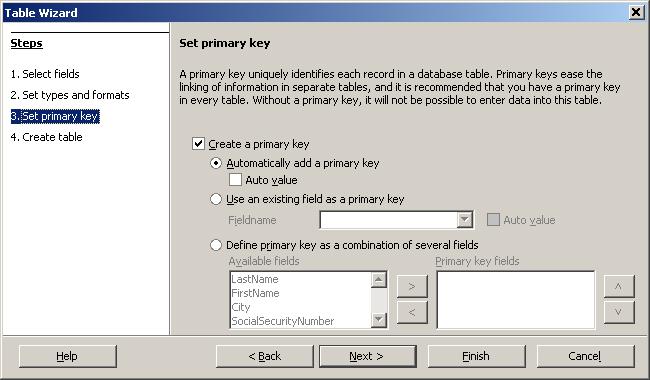
This screen allows the creation of a "primary" or "Key" field for each record. The valuse in this field MUST be unique, that is they can not be duplicated in any other record in the file. Examples of this sort of data would be Social Security Number, Driver's License Number, Student Number, etc. Note that "Automatically add a primary key" is selected. One of the selected fields could be used, or a combination of tow of more fields could be used. Leave the selections to the default values and click on "Next".
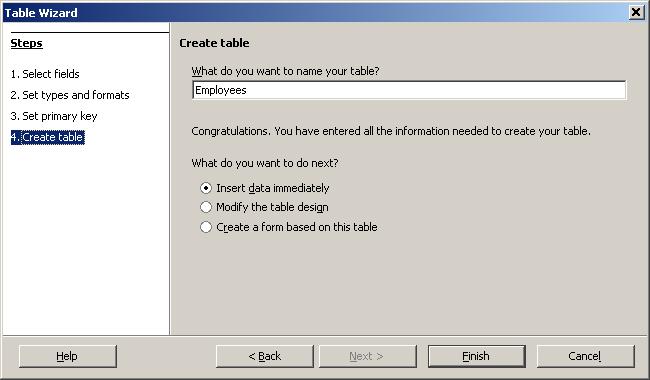
A data table has been created and needs to be saved within the data base. Now a name has to be applied for future reference. The name suggested by the program may be used or one may be typed in by the user. Type in the name "Employee".
The last thing to do is to let the program know what is to be done next. Add (or Insert) data. Click "Finish" (Finally!!!).
Now to enter data. Double click on "Employees". The next screen should appear.
Enter the following data in the first line (note that the field sequence for your file may be different so adjust accordingly). <ENTER> means press the ENTER key!!
ID: 1 <ENTER>
LastName: Jones <ENTER>
FirstName: Susan <ENTER>
City: San Diego <ENTER>
PostalCode: 92126 <ENTER>
Double click on the line between "City" and "PostalCode". This causes the width of the field to adjust to accommodate the data. Continue by adding the following data. Be sureto click on the"Save current record" button aftereach record to save the data.
The following figure shows the first record filled in.
p>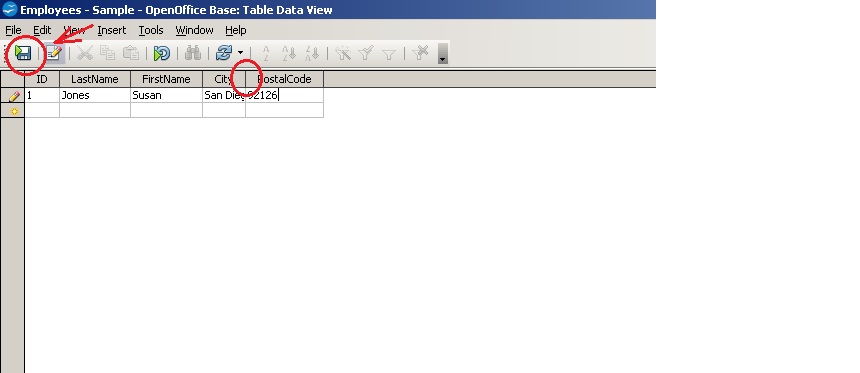
| ID | FirstName | LastName | City | PostalCode |
| 2 | James | Johnson | El Cajon | 20127 |
| 3 | Frank | Jones | Santee | 91115 |
| 4 | Ralph | Franklin | San Diego | 92109 |
| 5 | Jeff | Ridley | San Diego | 92117 |
Note that each row is adifferent record. Each column is a single type of data. After typing typing in all of the data, select "File" from the menu then click on "Close". The data edit window is closed.
Creating Forms using the Form Wizard
There are actually two types of forms - Screen Forms ("Forms") and Report Forms ("Reports"). The Report will be created later.
Screen forms create the interface between the database and the user. It is through the screen forms that records are typically entered, edited, and deleted. The OpenOffice wizard presents a 6-step process for the creation of a form.
Click on the "Forms" button on the left side of the screen. Then under tasks click on "Use Wizard to Create Form...". Move all of the fields to the "Fields in the form" box. Click on "Next". A sub-form will not be created during this exercise.
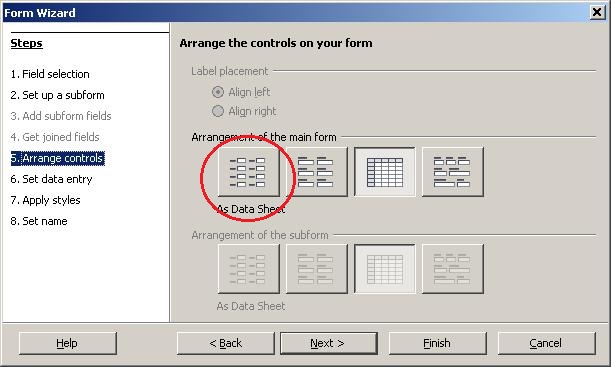
At this point a basic form design is being created. Note that there are four options. Each can be clicked on to see how it is set inthe form, in the background. Now select "Columnar - labels left". Then the field labels can be aligned left or right. Click "Next".
In the "Select the data entry mode", the default is used to display all of the data. Unless there is some over-riding reason to do otherwise, this will be the typical selection. Click "Next"
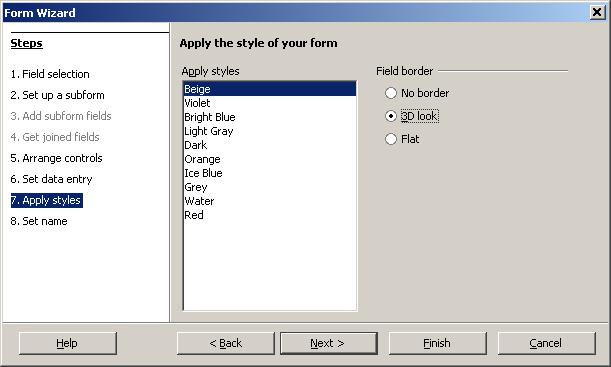
In this screen the background color can be selected along with the field border style. After the background color and field border style have been selected, click "Next".
The final screen allows the naming of the form. Once again the provided name can be used or an alternate name can be typed in. For the form name, type in "Employee Data Entry". Now work can be started using the form, click "Finish".
It can been seen that the form has been created and it is now ready to use.
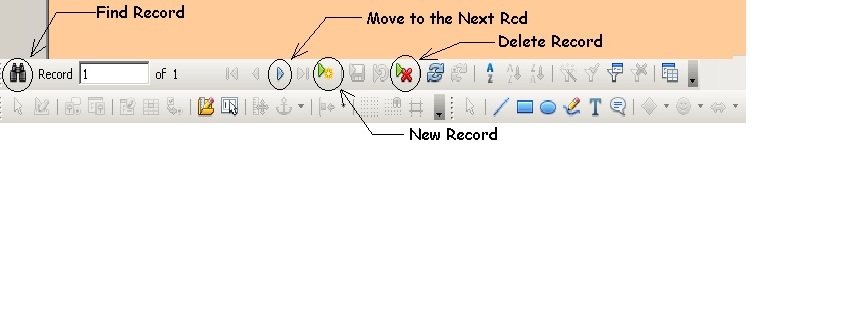
Look at the tool bar just below the form. The one that begins with the button that has binoculars. The binocular button is the "Find Record" button. Next is the record number being displayed. The record number is followed by the button that allows you to move to the next record; then to the endof the list of records. These icons are followed by the "New Record" button and then the "Delete Record" button.
When the editing of the database is completed select "File" from themenu bar then "Close".
Adding a Record
Double click (open) the Employee Data Entry form. Click on the "New Record" button. Click on each field and type in appropriate data. Find the"Save Record" button, next to the "New Record" button. Notice the number of records in the database has changed.
Deleting a Record
To delete a record using a form, locate the record to delete. The user can advance from one record to another or the "Find Record" button can be used.
After locating the record, find and click on the "Delete Record" button. A confirmation will be required. If "Yes" is selected the record will be deleted and it can not be restored.
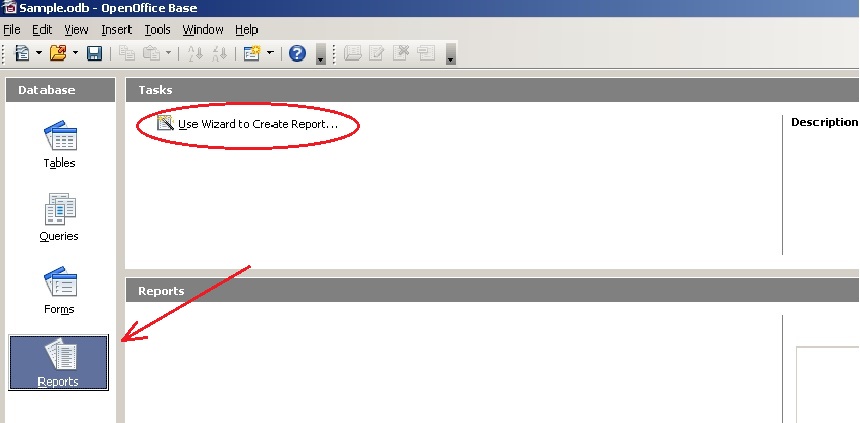
Creating a Report using the Wizard
If required - Open OpenOffice and click on Database.
Open the Home Finances database created in Exercise 1.
Click on the "Reports" button, on the left side of the screen, then click on the "Use Wizard to Create Repord...".
Move all available fields to the "Fields in Report" area. Select "Notes" and move it back to the "Available Fields" area.
Move "TransactionNumber" to the top of the list (if necessary) using the arrows on the right side of the "Fields in Report" area. Click "Next"
Relabel "TransactionNumber" to "Check/Deposit Number". Put a space between "Withdrawl" and "Amount", and between "Deposit" and "Amount". Click on "Next".
No sub-forms at this point. Click "Next".
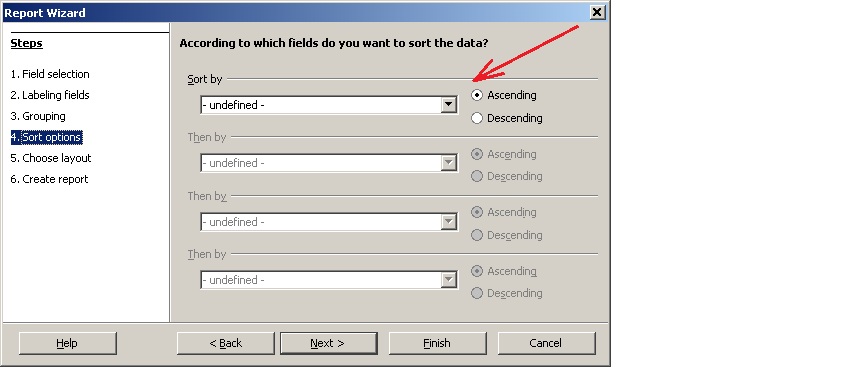
Notice that in OpenOffice the user is allowed to sort by as many as four fields. The first field indicated is the primary sort; the next field is sorted within the primary sort field; and so on. Select the "TransactionNumber" as the primary sort field (no other sorts for this exercise). Click "Next".
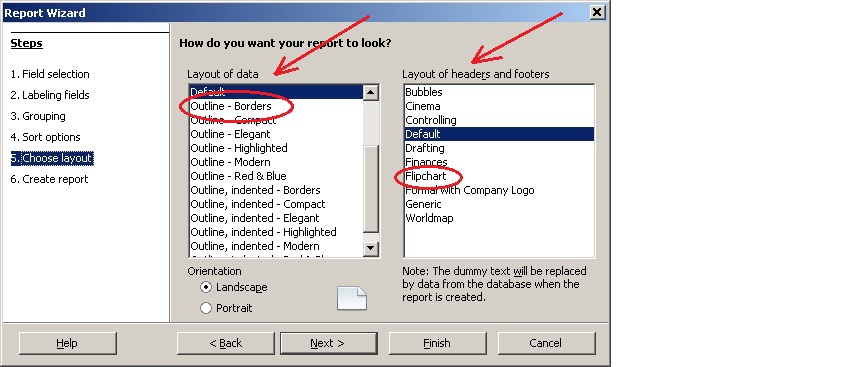
The next screen allows the modification of the report appearance. The first element is the "Layout of data"; the second is the "Layout of headers and footers". Choose "Outline-Borders" for the datalayout and"Flipchart" for the headers and footers. The orientation should be "Portrait". Click "Next".
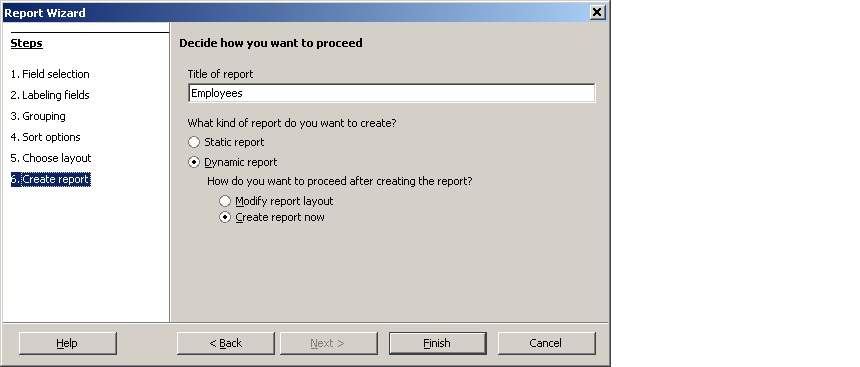
Now a name is required for the report form. A "Static report" will present the current available data but it can not be changed. A "Dynamic Report" will be recreated each time the report is viewed. Select "Dynamic Report". Press "Finish". Click on the "Save" button.
The report can be edited. Click on the "Reports" button to display the report. Right click on the report to be edited and select "Edit". At this point the title and other elements of the report can be modified.
Opening Database files from the OpenOffice main menu
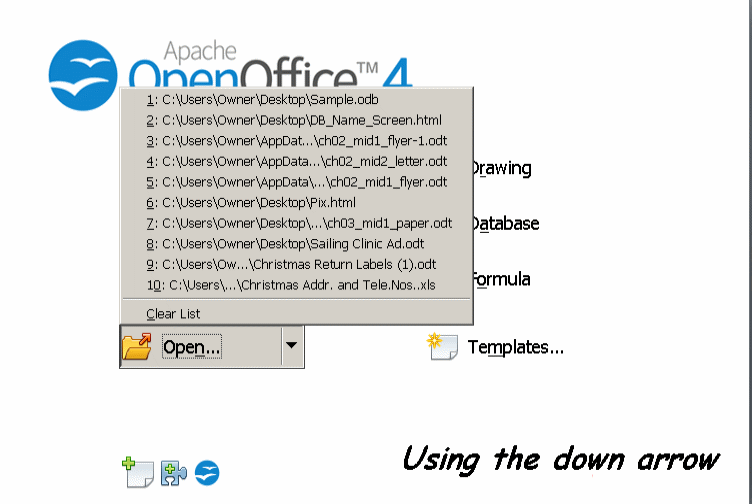
Run OpenOffice. Note the "Open..." option. Open allows the user to display the files in two forms. The down arrow (next to Open) displays a list of the most recent files that have been used or modified by OpenOffice, regardless of the location.
Clicking on the main portion of the Open button displays all files and directories located in the default directory. One can focus the display by clicking on the down arrow to the right of the "All files (*.*) display.
After clicking the arrow notice that the top portion of the list is OpenOfficespecific catagories. Click on "Database documents". Folders and Database files will display. Click on the desired file and click on "Open".
Accessing a spreadsheet from Database
From the OpenOffice menu click on Database. The first wizard screen will allow the connetion to various types of files. Click on "Connect to an existing database (the third radio button). Click on the down arrow to the right of the text area. Scan down the options and select "Spreadsheet". Click on "Next". Locate the file to be used. "Browse" can be used to find the folder and file. After selecting the file to use click on "Open" then "Next". Register the the database and click on "Finish".
As before name the database file and identify the location to place it. The name of the data table will be the same as the spreadsheet file. Double click the table to view and edit the table.
Widen the display of the columns by double clicking the line between the column names, as appropriate. Close the table and save the database.
Complete the query exercise. You will be required to have both Base and Writer open to paste your query results into. All screen prints need to have a notation as to the Step Number that generated the result. The write document will be the fourth required file attachment. The database file will be the fifth file to be attached.
To review copying refer to the Cut-N-Paste cookbook link.
After all exercises have been completed, attach the edited (modified) files to an e-mail and send the package for review. There should be a total of 3 file attachments